Welcome to use Virtual GamePad
Introduction
The Virtual GamePad is a software that simulates a game controller using the Bluetooth device of a mobile phone. It can turn your mobile phone into a virtual game controller. It is neither a management software for a specific controller nor a mapping tool for a certain controller; it is the controller itself. Since Android 9, Android mobile phones equipped with Bluetooth devices can be registered as Bluetooth input devices. This software precisely makes use of this capability of mobile phones to achieve the functions of a game controller. Therefore, in order for this software to run properly, the following conditions must be met at a minimum.
- The system version should be at least Android 9 or above.
- The mobile phone should support the Bluetooth function and grant this software the permission to use Bluetooth.
1. GamePad List
After opening this software, the controller list will contain two items by default. The first item is a virtual controller with a standard layout, which includes 14 basic buttons, two joysticks, and two triggers. The second item is a controller with a non-standard layout, which includes a steering wheel, a combined trigger, and approximately dozens of buttons. In addition to the two default controllers, users can also click on the menu in the upper right corner to add a controller with a custom layout. After adding a controller with a custom layout, it will be displayed in this list, located below the two default controllers.
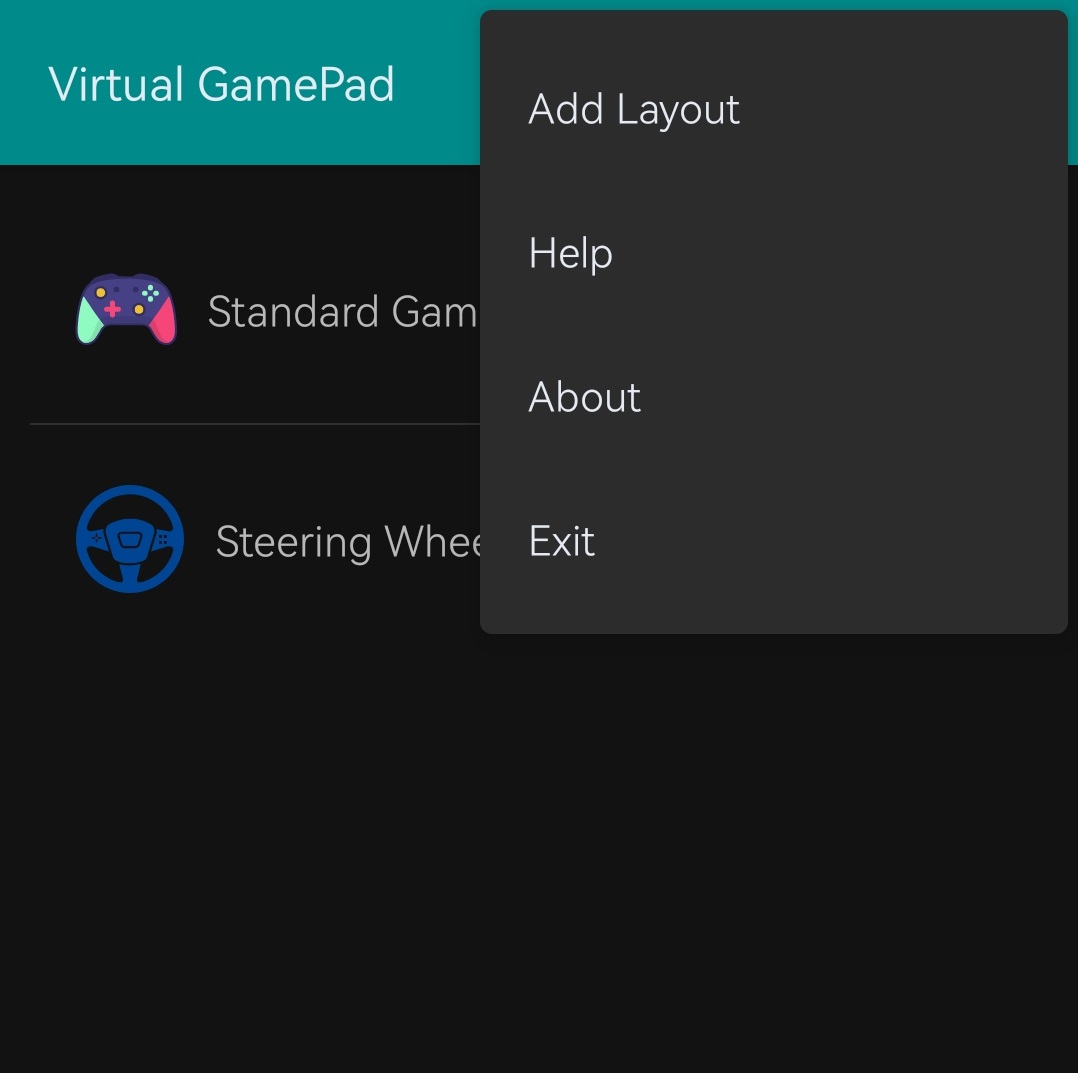
The two default controllers in the controller list are the built-in controllers of the software, which provide the basic functions of this software and cannot be modified or deleted. There is an operation button on the right side of the custom controller item added by the user. Clicking this button can bring up the management menu of this controller. Through the management of the menu, users can perform operations such as renaming, deleting, and editing the layout of this custom controller. In addition, users can also bring up the management menu by long-pressing the list item, which has the same function as the operation button on the right side of the list item.
2. Connect Guide
After clicking on an item in the list, the startup wizard will be launched. This wizard will guide users on how to correctly turn on the Bluetooth of the mobile phone and establish a connection between the mobile phone and game console devices such as laptops and tablets (hereinafter referred to as the host). If a Bluetooth connection has been established between the mobile phone and the host before starting this software, please make sure to cancel the pairing on both the mobile phone and the host, and then follow the instructions of the wizard to re-establish the Bluetooth connection step by step. The first step of the wizard is to guide users to grant this software the permission to use the Bluetooth function of the mobile phone and turn on the Bluetooth device of the mobile phone. If the user has already granted this software the permission to use the Bluetooth function, the first step will be completed automatically, and the Bluetooth discovery function will be enabled, allowing other devices to scan and connect to the mobile phone. At this time, the wizard will proceed to the second step, waiting for the host to connect. The user needs to turn on the Bluetooth of the host and search for and connect to the mobile phone's Bluetooth according to the prompts of the wizard.
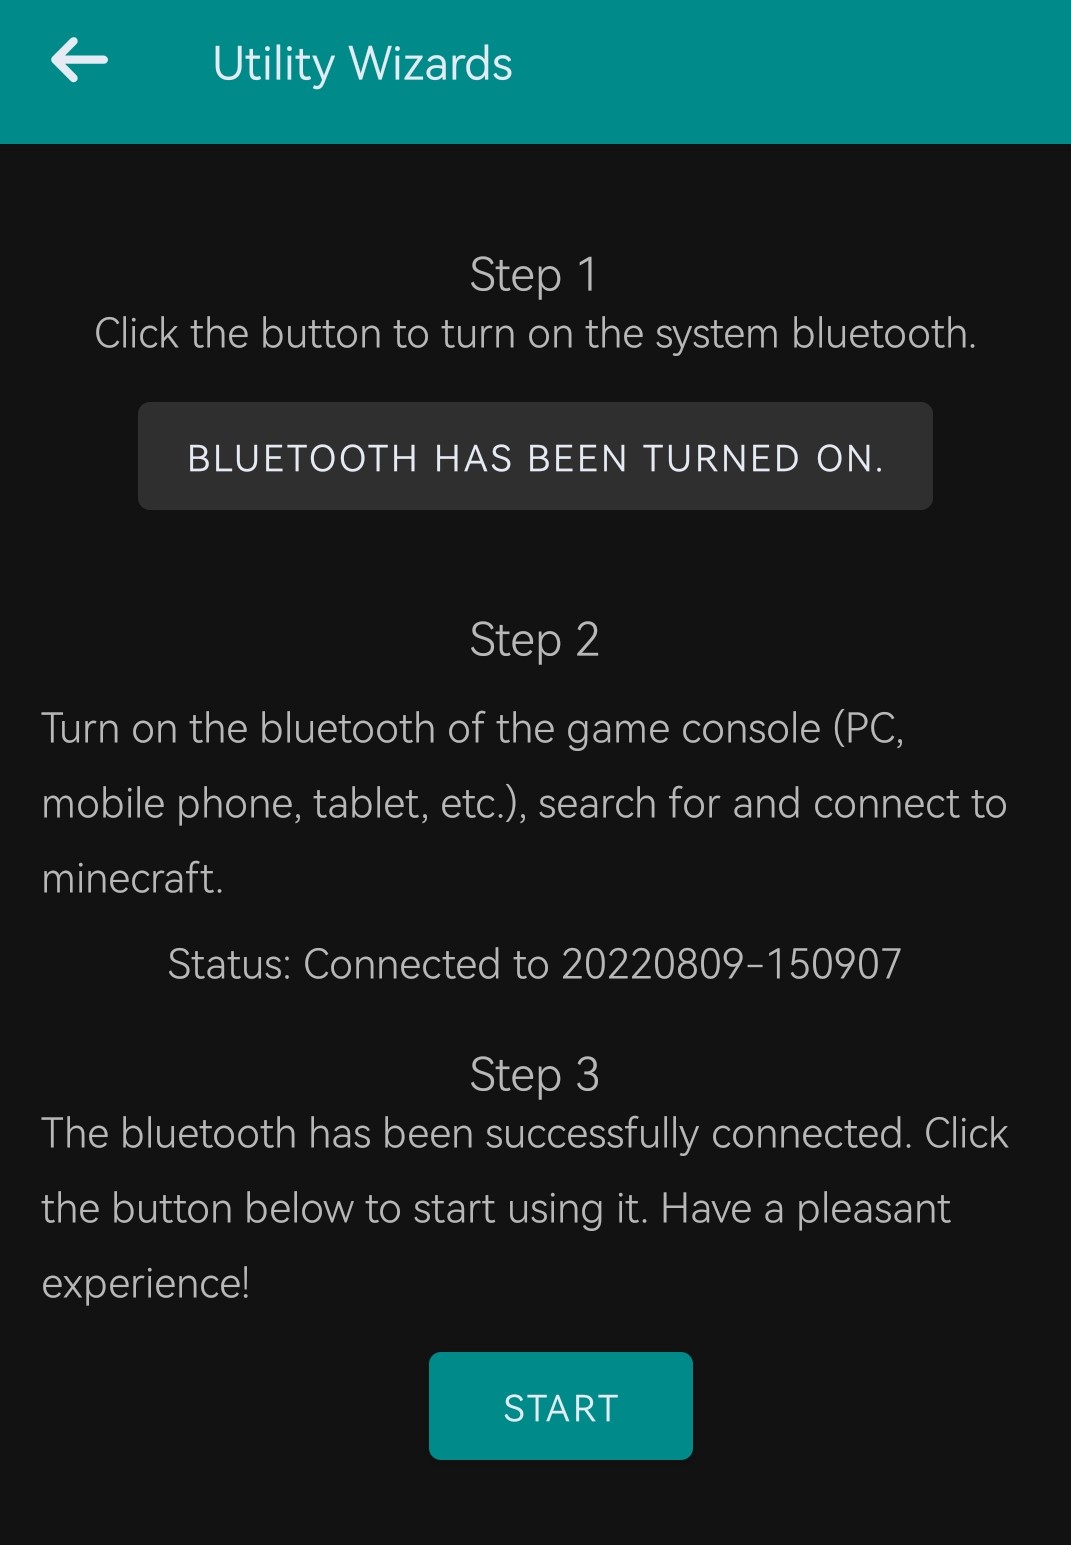
Note that you should not use the Bluetooth search function on the mobile phone side, and even less initiate a pairing request from the mobile phone side. The pairing request must be initiated from the host side, such as a laptop or a tablet computer. If the connection and pairing are successful according to the guidance of the wizard, a "Start Using" button will appear. Clicking this button will take you to the virtual controller page, and then you can use it normally. If the laptop or tablet computer shows that the pairing is successful, and the Bluetooth name of the mobile phone is also displayed in the paired list, but the "Start Using" button is not shown in the wizard of this software and it is still waiting for the connection, it means that the connection method is incorrect. Please cancel the pairing on both the host side and the mobile phone side and then retry the above process.
Use GamePad
The virtual controller of this software does not have dedicated driver support on the host device. Therefore, when this software is connected to different systems, the compatibility levels vary. It mainly relies on the built-in key mapping function in the game and various third-party key mapping tools.
Key Mapping
This software has not undergone large-scale game compatibility testing, and there is no guarantee that it will be compatible with various games. Therefore, in actual games, the game functions corresponding to the controller buttons may not necessarily be reasonable. If you encounter the situation of chaotic controller function mapping, please adjust it through the relevant button settings function built into the game to ensure the controller and gaming experience. If the game does not provide the relevant settings function, you can adjust it through a third-party button mapping tool (such as AntiMicroX).
3. Define Layout
Click the "Add Custom Controller" button in the menu at the upper right corner of the controller list interface to enter the custom layout interface. There is a toolbar at the top of the custom layout interface, which provides basic operations. On the background of the interface, there are some grids to facilitate the alignment of various components.
Tool Bar
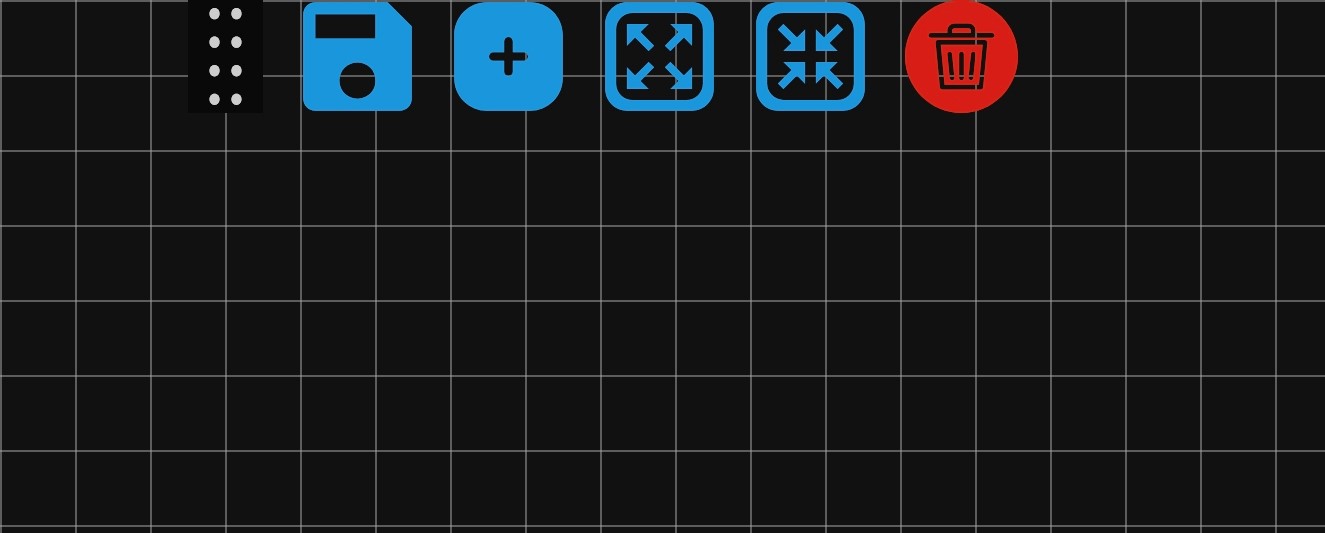
There are five buttons in the toolbar. From left to right, they are Save, Add Component, Enlarge Component, Reduce Component, and Delete Component. In addition, there is a slider on the far left of the buttons. Hold the slider and drag it left or right to adjust the position of the toolbar to the left or right.
Component List
Click the Add Component button in the toolbar to bring up the component list on the left. The component list includes triggers, joysticks, steering wheels, D-pads, and several buttons.

Add Component
Click on an item in the list, and a corresponding component will be added to the canvas.
Edit Component Position&Size
Drag the component to adjust its position, and the component will automatically snap to the nearest grid. Use two fingers to zoom on the blank area to adjust the size of the component. You can also click the zoom button in the toolbar for more precise adjustment of the component size.
Delete Component
Drag the component to the position of the delete button in the upper toolbar, and the component can be deleted. Alternatively, when the component is in the selected state, click the delete button to delete the component.
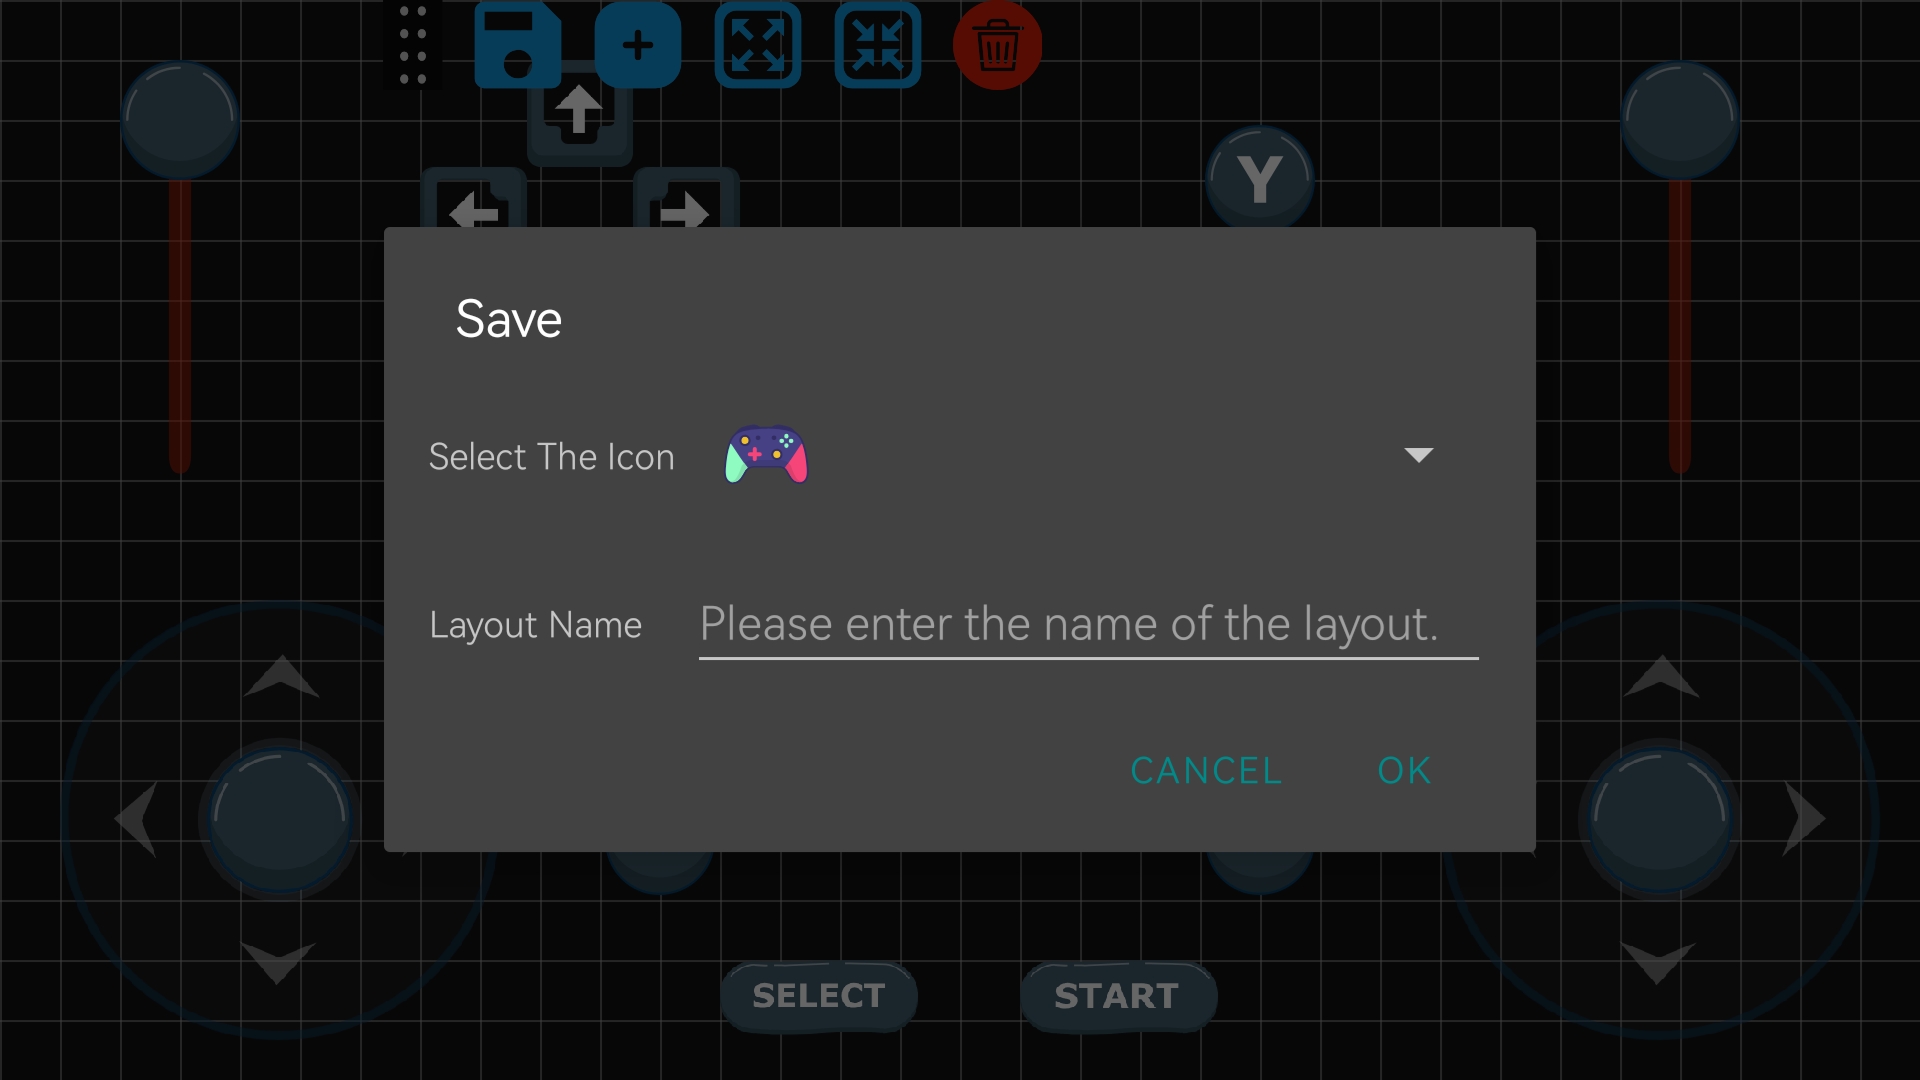
Save the custom layout
After adding the components and adjusting their positions, click the Save button in the toolbar above. A save dialog box will pop up. Enter the name of the controller, and then you can save it successfully and exit the editing state, returning to the controller list.
Note that the custom controllers of the current version are saved in the storage of the mobile device. Therefore, changing the mobile phone or uninstalling this software will cause the custom controller layout to be permanently lost.
Component Description
In the custom layout, components are divided into two major categories: One category is the components with shared key values, including the left and right joysticks, left and right triggers, the directional pad, ABXY buttons, START, SELECT, the left joystick button, the right joystick button, LB button, RB button, and the steering wheel. Multiple of these components can be added, but they share the same key value. For example, if multiple A buttons are added, and any one of them is mapped through a game or software, then the other A buttons will also be automatically mapped to the same function. The other category is the extended components, including combined triggers and various icon buttons. For each of these components added, it represents an additional button or axis. For instance, if two digital buttons labeled 1 are added simultaneously, these two buttons labeled 1 are buttons with different functions, and they can be mapped to two different functions respectively. According to different component types, the maximum number of custom components that can be added varies. At most, one steering wheel, two joysticks, three combined triggers, 78 different buttons, one left trigger, and one right trigger can be added.